User Guide
A complete tutorial regarding how to use GoSurvey. We have covered and explained everything related to the working of GoSurvey and its features.

How to create a user?
GoSurvey allows to create as many users as needed for the business to delegate tasks of creating surveys, managing field surveyors etc.. At a time, a single user can be created or multiple users with the same role and survey access can be created.
To create a single user follow below process:
Step 1:
Once login to GoSurvey admin site, click on the Users menu.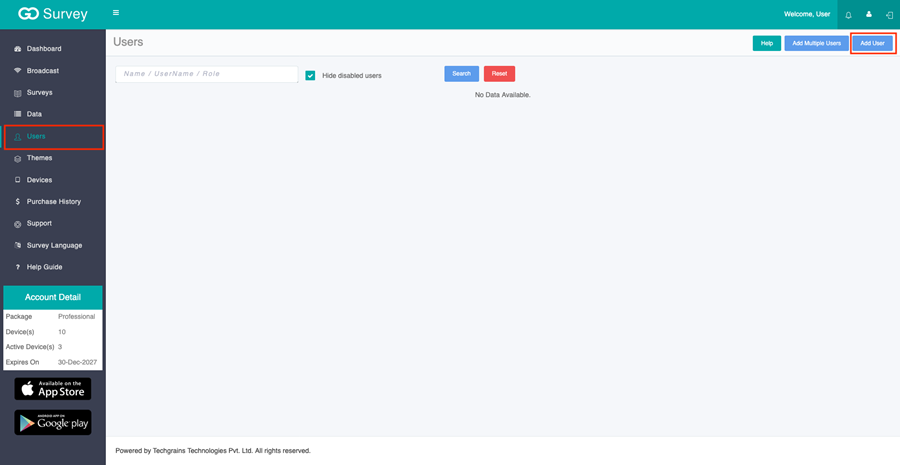
Step 2:
Click on the “Add User” button.
Step 3:
Provide required details as below: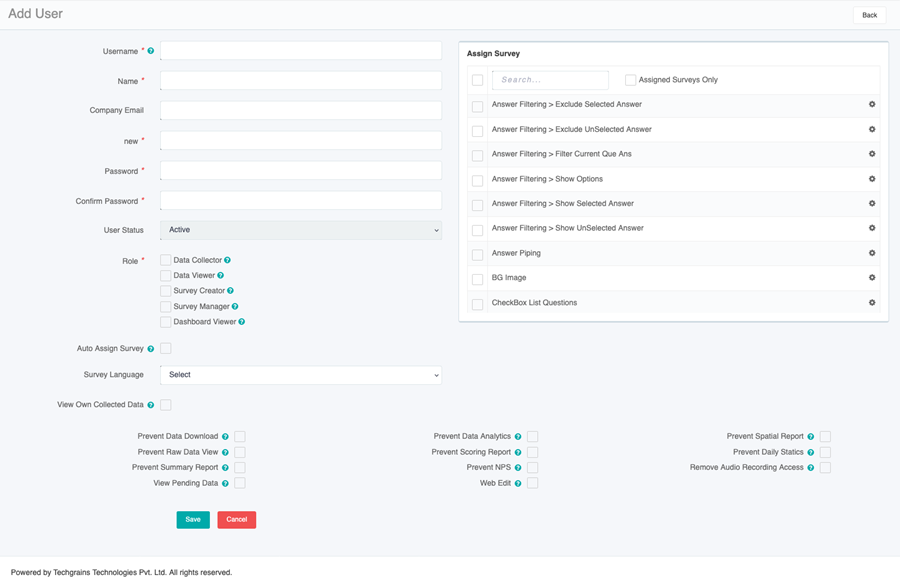
- Username This is the name given to the user to login in the admin and/or GoSurvey App. This username is unique across the GoSurvey authentication system.
- Name Display name of the user to be created
- Email Address Enter the valid email id of the user. The email address is unique across the GoSurvey users. The email address is optional. If provided and the user has access to download data, the user will be notified over email once the data is prepared for download.
- Password Set a password for the user to give privacy to the user created.
- Confirm Password Anyone could easily make a mistake and submit the wrong password , so it's better to confirm the password, just retype the text which was entered in the “Password” field.
- User Status Indicates whether the user is Active or Disabled. A newly created user is Active; this can be changed later while editing the user.
- Role GoSurvey provides different types of roles through which a fixed set of the access be granted to the user. A user can have more than one user role assigned too.
- Data Collector - Users under this role will only have access to collect the responses from the application and cannot operate the admin system.
- Data Viewer - Users with this role will have access to view the data and generate reports. Also users will be able to download data in various formats.
- Survey Creator - Users under this role will have access to create surveys, themes and users.
- Survey Manager - Users assigned with this role will have access to every activity except data collection. The user with this access will be able to edit or create the surveys, view and download data and reports, create users.
- Dashboard Viewer - Users under this role will be able to see the dashboard only, users, and assign users to surveys.
Step 4:
Check "Auto Assign Survey" when the user should automatically receive every survey created in the account after this user is saved. Surveys that already exist are not assigned here; select those in Assign Survey. If Dashboard Viewer is selected, this option is turned on and cannot be changed.
Step 5:
If user needs to see responses that were uploaded under his username - check the "View Own Collected Data". This option is relevant if given user has "Data Viewer" or "Survey Manager" role assigned along with "Data Collector".
Step 6:
In the "Assign Survey" panel, check the surveys these users can access. Use the search box to find a survey, the header checkbox to select all listed surveys, and Assigned Surveys Only to show only the surveys already checked. The same surveys are assigned to every user created from this screen.
Step 7:
"Survey Language" is the language this user will see in the GoSurvey app. If no language is selected, the survey opens in its default language.
Step 8:
Set the additional options for the user.
Options that restrict access. When checked, the user will not see that area:
-
- Prevent Data Download The user will not see data download options.
- Prevent Data Analytics The user will not see data analytics.
- Prevent Spatial Report The user will not see the spatial report.
- Prevent Raw Data View The user will not see the Raw Data View.
- Prevent Scoring Report The user will not see the scoring report.
- Prevent Daily Statics The user will not see daily statics.
- Prevent Summary Report The user will not see the summary report.
- Prevent NPS The user will not see the NPS report.
- Remove Audio Recording Access The user will not have access to audio recording files.
Options that allow access. When checked, the user gets that access:
-
- View Pending Data When the survey uses Data Review, the user sees only the responses that are still pending review.
- Web Edit Allows the user to edit individual records through the web form.
Step 9:
Click on the “Save” button.
To create multiple users follow below process:
Step 1:
From the “Users” view, click on the “Add Multiple Users”.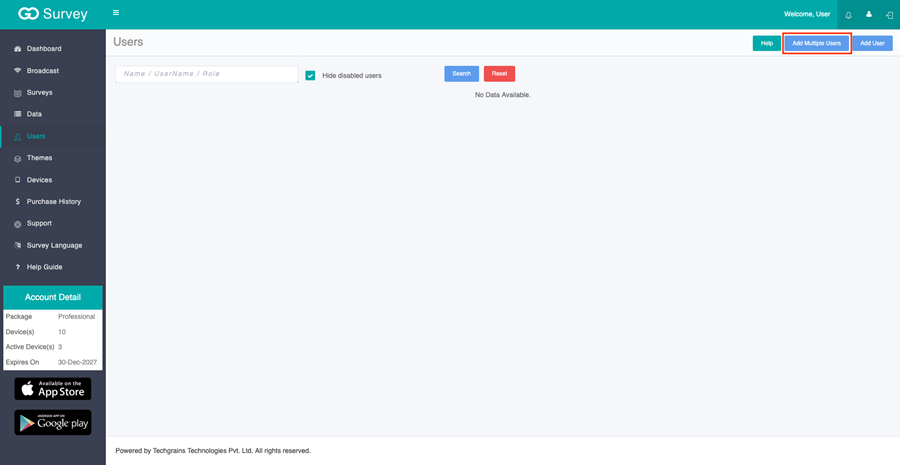
Step 2:
In the “User Details” section, provide multiple user’s details. Each row should have Name, Username and Password with a comma as value separated.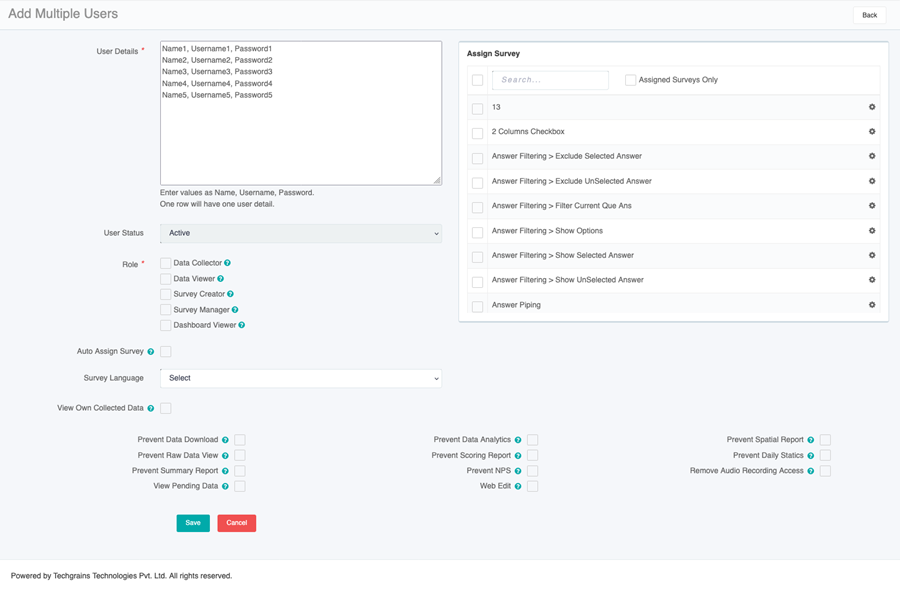
Step 3:
Assign required “Role”. All users will have the same role assigned.
Step 4:
In the "Assign Survey" panel, check the surveys these users can access. Use the search box to find a survey, the header checkbox to select all listed surveys, and Assigned Surveys Only to show only the surveys already checked. The same surveys are assigned to every user created from this screen.
Step 5:
Check "Auto Assign Survey" when the user should automatically receive every survey created in the account after this user is saved. Surveys that already exist are not assigned here; select those in Assign Survey. If Dashboard Viewer is selected, this option is turned on and cannot be changed.
Step 6:
"Survey Language" is the language this user will see in the GoSurvey app. If no language is selected, the survey opens in its default language.
Step 7:
Click on the “Save” button.